Tuesday 25 October 2016

Rings and Handstand Superpack is Now Open (until Friday!)

It’s here! Pop the confetti!

dance_giphy

I’m super excited to announce that our new easy-to-follow bodyweight training system — The NF Rings and Handstands Superpack— is now open! 

I’d love for you to check it out and decide if it’s right for you! We’ll be showing you, step-by-step, how to gain complete control over your body, look like a gymnast, and perform like a Jedi — in your home or at the gym.

handstands-logorings-logo

Remember Rule #1 of The Rebellion: “We don’t care where you came from, only where you’re going!” Young, old, big, small, male, female, or robot, the skills we’ll teach you in Rings and Handstands Superpack know no bounds, gender, age, or level of artificial intelligence.

We’ll meet you exactly where you’re at — whether you’re a beginner who’s nervous about training with rings or a super-advanced fancy person — and show you how to move your body in ways you never thought possible.

You CAN get in the best shape of your life, starting now. And we can help.

rings and handstands
Here’s just a small taste of what we have waiting for you in the Rings and Handstands Superpack:
  • 80+ HD individual video lessons: We’ll guide you through an effective and fun exercise system using rings and your own bodyweight  — starting with VERY basic exercises that anyone can do — and help you progress to some amazing new moves!
  • An easy-to-follow skill tree system: The problem I’ve found with other bodyweight programs is they don’t actually tell you when to level up to the next step! That’s why we’ve created skill-trees that update as you check them off — so you’ll always know your next step. No matter where you’re starting from, we’ll show you EXACTLY what moves to work on first —and we’ll guide you to the next level in your own time.
  • Professional goofball guidance: Me and Jim (aka Master of the Fitness Universe) walk you through a step-by-step system for building muscle, increasing strength, and losing fat — using only your bodyweight. Jim has 15+ years of experience learning and teaching this stuff.
  • Special Private Bodyweight Training Facebook group: The Nerd Fitness Rebellion rocks. (Of course, you already know this!)  Getting healthy and leveling up your life can at times be a little lonely – especially if you’re training in a different way – but it doesn’t need to be. That’s why you also get access to a special, private “bodyweight training” group where you can ask questions of other jedi-assassin-ninja-robots in training.

Me and the rest of Team Nerd Fitness are so excited to help you get started with these movements. We want to show you how to level up your fitness, get control over how your body moves, and surprise the heck out of yourself and your friends — all in the comfort of your home (or a gym if you prefer).

(Important: This is the ONLY time we’ll ever offer the Rings and Handstands Superpack at one affordable price. It’s open until this Friday at 11:59 PM Pacific — after that, we’re not sure when we’ll release either course again.)

If you want to find out just how much your body is capable of (hint: it’s a LOT), now is the time to act.

Training with a system like this has been one of the greatest surprises I’ve had with for MY personal physique, strength, and happiness. I am a different person now than I was 3 years ago, and training with a system like this been a game changer. I want the same for you.

Jim, Staci, and I can’t wait to hang out with you in the community with this course!

Let’s get weird!

-Steve

PS- I’m sure you have lots of questions, so I took the liberty of answering a whole bunch of them (including a question about teleportation…) here on this page:  Click to get all the details.


source http://www.nerdfitness.com/blog/2016/10/25/rings-and-handstand-superpack-is-now-open-until-friday/

Sunday 23 October 2016

Managing Brain Fog – An Elemental Approach

You live a busy life, juggling work, family, domestic responsibilities and your smartphone, sometimes literally.  Some days it seems difficult to focus, there’s too much going on, and it feels like you are separated from the world around you by a veil.

The term brain fog describes the symptoms well, with people feeling as though there is a thick fog dampening their mind.  While it’s not a formally recognised condition, and usually treated by the medical industry as a disparate collection of symptoms, brain fog is a surprisingly common affliction that affects many people, regardless of their age.

What is it and how can we address it?  The ability to bring clear and focussed attention to a task or situation is the endpoint of a whole raft of physiological (and psychological) processes that depend on the full functioning of your body.

Let’s look at the physiological requirements using a simple model we call the Elements of Vitality:

The Eastern philosophy of medicine teaches that vitality comes from a balance of four elements – air, earth, fire and water.  To apply that to our daily life we will equate air to breathing and rest, earth to food and nutrition, fire to movement and exercise and water to hydration.  Using this model, let’s look at brain fog and how we can clear it away.

Air = breathing & rest

We live in a culture that created a virtual pandemic of sleep deprivation.  Science tells us we need 7-8 hrs a night but most people don’t do that every night and some exist on much less than that on a regular basis.  The purpose of sleep is to allow time for metabolic waste products produced during waking hours to be cleared from the brain, which needs the “downtime” to do so.  The accumulation of these waste products appears to have long term negative implications but the short term effect is a solid foundation for brain fog.

Earth = food & nutrition

If you think your kids are picky eaters then your brain has them beat.  Except in some rare situations that we’ll get to shortly, the brain will only consume one energy source: glucose.  About 120 grams of it per day.  Most people don’t eat 120 grams of glucose a day so your brain depends on a sequence of metabolic transformations of other nutrients in your food to supply this requirement.  That metabolism depends on enzymes and a whole range of micronutrient cofactors working on food-borne nutrients that have already been digested and often transformed by gut bacteria.  Getting all of these nutrients from a balanced diet, in a busy life, can be a challenge but if it’s not done the metabolic machinery grinds to a halt.  In starvation the brain can run on another type of fuel – ketone bodies – but many people report that when this happens they feel “foggy”.  So a poor diet can provide another source of brain fog and one that a good, whole food based nutritional supplement can quickly address.

Fire = movement & exercise 

Sedentary lifestyles are becoming the norm rather than the exception and a steadily increasing accumulation of data all confirms what we have long suspected –it’s not a healthy way to live.  From the point of view of brain fog the studies suggest that movement and exercise keep the nervous system activated, simulate the brain with environmental inputs, and release hormones and neurotransmitters that improve mood, memory and focus.  Regular exercise keeps all of our secondary metabolism in good order, ensuring that we can deliver the brain it’s glucose fuel and clear metabolic waste products effectively.  Lastly, movement, especially if it’s away from the desk or off the couch, gives you a new, and hopefully clearer, perspective on the world around you.

Water = hydration

The most accurate estimates put the percentage of water in the average human body at 60% if you are a man and 55% if you are a woman.  Consistent, regardless of gender, is the fact that your brain is 75% water and if that water fraction drops by even a few percent there is a significant negative effect on function with tiredness, confusion and irritability among the key clinical signs of severe dehydration.  So it’s safe to say that even a modest level of dehydration will contribute to brain fog and the simplest “treatment” is drinking a glass of water.  Maintaining correct hydration as a matter of habit will go a long way to support all of the other processes we have discussed above and help move you from foggy to clear headed as your normal state of being.

About Dr JB: After losing his father, who was 54, when he was just 13, Dr. JB decided that it was a medical career he wanted to pursue in order to prevent more premature deaths like that of his father.

After completing his graduate doctorate in Shanghai, Dr JB realised the lagging of Western medicine, which he sees as a real issue even today, believing that there really is too much focus on ‘cure’ and not enough time or research dedicated to prevention.

As an Associate Member of the Australian College for Nutritional and Environmental Medicine, the Royal Australian Chemical Institute and a Chartered Chemist, Dr JB has also worked as the Lead OHSE Auditor for the CSIRO, and has published widely on on the development of nutritional supplements and functional food as well as nutrition, hydration and water quality. Dr. JB is currently the Chief Science Officer at Activated Nutrients.

The post Managing Brain Fog – An Elemental Approach appeared first on Fitness In The City.


source http://fitnessinthecity.com.au/live/managing-brain-fog-an-elemental-approach

Wednesday 19 October 2016

5 Common Push-Up Mistakes to Avoid

Push-ups!

Maybe the most primal and basic of all exercises. We all know what they are. We all try to do them and know that they’re good for us.

But like squats and pull-ups, 95% of the people I see doing push-ups do them wrong. Ruh roh.

Right now you might be wondering whether you’re in the 95% or the 5%. You might also be wondering what the airspeed velocity of an unladen swallow is.

Well, I can help you with both of those. The answer to the second question is 11 meters per second.

As for the first question, I’m going to make sure you are in the 5% by the end of this article. Here are the five most common mistakes I see when people do push-ups. If you are concerned at all about your shoulder health or longevity of your muscles and building functional strength, read on!

Watch the video below, read the accompanying cues, and start doing correct push-ups today!

Build an incredibly solid foundation, and you’ll be on your way to attempting more complex bodyweight movements in no time. But like the foundation of any house, you need to start with a solid base.

That solid base means doing functionally correct squats, push-ups, and pull-ups.

Let’s put the “fun” back in “functionally correct push-ups!”

(Yes I realize that’s not a “thing” but trust me, the jokes are only going to get worse from here on out.)

Steve Ostrich

5 Mistakes People Make with Push-ups

Click the video to play, or view here.

Mistake #1: Flaring your elbows out wide. In a correct push-up, hand position and elbow position are crucial. Your elbows should be tucked in slightly, not out like a chicken!

Solution: Imagine you were trying to give someone a light push. You wouldn’t squeeze your elbows directly into your side, and you wouldn’t lift your elbows up to your ears (hopefully). Instead, you will likely fall somewhere halfway between that.

In other words, when you drop into your standard push-up, your upper arms should be at your sides at about a 45 degree position to your body. Your hands should be slightly wider than shoulder width apart.

Be sure to set yourself with a good starting position, with your hands about shoulder width apart on the ground or just slightly wider. Too wide will allow those elbows to flare outwards!

Mistake #2: Not doing a full rep (and not knowing what a full rep really looks like).

Not sure if you are doing a full rep? You should be able to pick your hands up off the floor at the bottom (called a hand-release pushup in the CrossFit world). You don’t actually have to lift your hands up, but if doing so at the bottom of your pushup would require some Wingardium Leviosa action (i.e. you are not all the way to the ground) then you can stand to go lower!

Solution: Touch your chest to the floor. (And check your ego at the door.) If you can’t touch your chest to the floor and do a proper repetition, see Mistake #5.

Mistake #3: Not maintaining a straight line from head to toes. Don’t do the worm! Your whole body should move up and down together. We often see this when people get tired or do too many reps: your upper body comes up before your lower body! Your body should basically be in a plank position from head to toe: core tight, butt clenched, through the entirety of the reps!

Solution: “Tight gut, tight butt.” First, simply make sure you aren’t doing the worm, and if you are, squeezing the midsection and hips is an easy to remember cue.

Mistake #4: Your head/nose touches the ground first. Your chest should be the first thing to touch the ground, not your nose – unless you’re Pinocchio and you’ve been telling lies.

Solution: Stop lying. ALSO, keep your head tucked back slightly to prevent the chicken head. If you follow the other cues to make sure you are achieving a full repetition, poor head alignment will be obvious (it will hit the ground!).

Mistake #5: Trying a variation that is too hard, with too little strength. When we load too much weight on an exercise, try a bodyweight variation that is too difficult, or attempt more reps than we have the strength for, form breaks down in all sorts of weird ways. If you try the solutions we’ve presented above and STILL can’t manage a pretty push-up, then an easier push-up variation is the best course of action.

Solution: Easier pushup variations! If you can’t do a push-up with proper form, work up to them! If you need to, start with knee pushups. If you need to start with something easier, try doing push-ups with your hands on a stable elevated surface. You can also combine the two and do knee push-ups on an elevated surface. Set good form now, and you will make progress much faster. It is far better to do easier variations with proper form than to do shitty regular push-ups.

Start doing better pushups today!

There you go, my dear rebel friend, you now have everything you need to get started down a healthier path to crushing push-ups.

To recap:

  1. Ensure proper hand and elbow position
  2. Make sure you’re completing full reps
  3. Keep your body straight
  4. Keep your head in line
  5. When in doubt, build up your strength with easier push-up variations

And make sure you’re on our email list for an announcement about a special bodyweight-related project!

What are some other problems you have with push-ups?

Feel more confident to give them another shot after today?

Let us know!

-Steve

###


source http://www.nerdfitness.com/blog/2016/10/19/5-common-push-up-mistakes-to-avoid/

Monday 17 October 2016

A Beginner’s Guide to Handstands

I bet you’ve always wanted to do a handstand.

It’s okay, you can admit it.

It demonstrates balance and control over your body, something we happen to put great importance upon here at Nerd Fitness. It’s also one HELL of a party trick, something you can work on without a single piece of equipment, builds functional strength and muscular endurance, and it’s a skill you can work on in just a few minutes every single day.

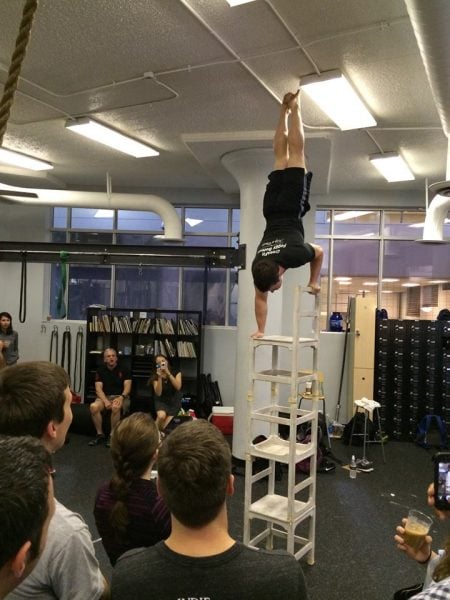
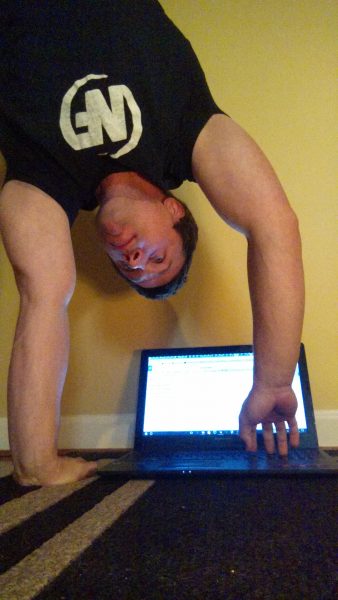
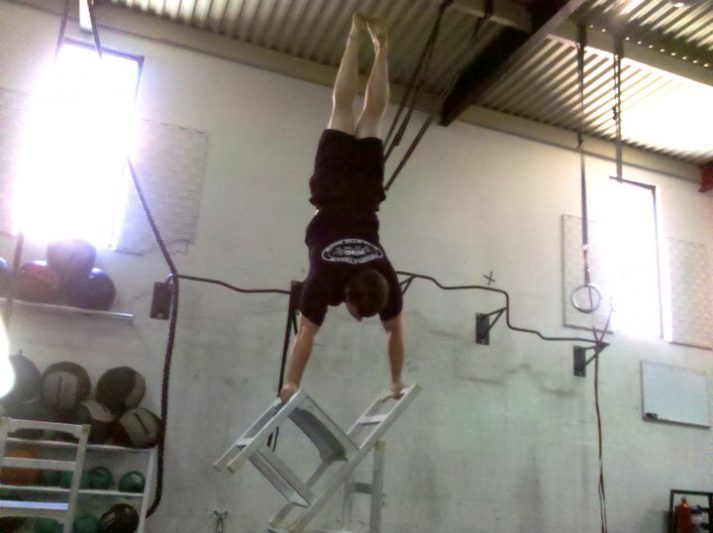
How do I know this? Because I’m typing this while in a handstand RIGHT NOW. Okay, I can’t do that. But Jim, Master of the NF Fitness Universe can:

jim typing

I love working with gymnastic rings, because they have such a great tutorial level. Handstands are exactly the same way: it’s a great skill to work on as a beginner, but also is infinitely challenging depending on your skill level.

Plus, in addition to Jim, Luke Skywalker does them. It’s time to stop looking at other people doing cool things and start today saying “hey, I can do that too!”

Why handstands are awesome

Jim-Bathurst

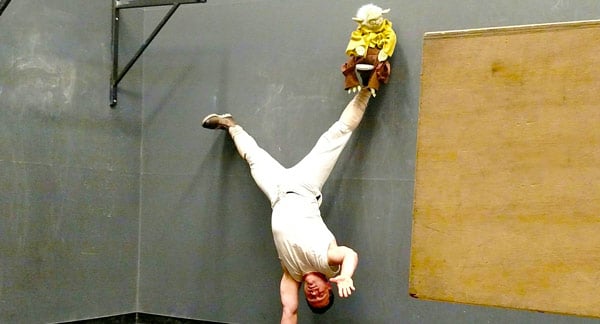
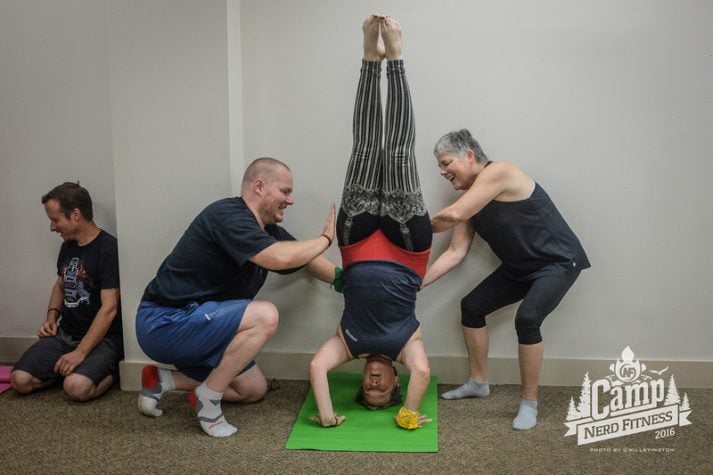
Team Nerd Fitness member Jim Bathurst (Aka Master of the Universe) has been training and working on handstands for years. From humble beginnings, he taught himself a standard handstand and eventually worked his way up to one-handed tricks like the photo above.

Now, you won’t be doing this anytime soon, but it doesn’t mean you can’t start today learning how to go inverted.

Fun fact: I can’t say the word inverted without thinking of Top Gun’s line “because we were inverted,” but that’s only because I used to watch that movie with my brother every day from ages 3 to 5.

I’ve fallen in love with handstands for a few reasons:

Like other bodyweight training, there’s no excuse. If you have room to stand up, you have room to practice handstands.

It recruits DOZENS of muscles in your body. From arm strength to wrist mobility to core strength to shoulder mobility and muscular endurance, handstands do it all. When you are trying to balance, it makes your body work as one complete unit.

It scares you – yes, that’s a positive. We grow outside our comfort zone and for many people, just the thought of a handstand is enough to make their palms sweaty, knees weak, arms are heavy. Vomi… nevermind. The point is that the handstand is just as much of a mental challenge as it is a physical one. How scared do you think this guy gets on a regular basis?

jim chair

The biggest challenge with handstands isn’t what you think

fear egg crush

Sure, we need to build strength to support ourselves upside-down, but even that hurdle is overblown.

A proper handstand actually starts to feel easy. That’s because once your balanced and aligned, it becomes uber efficient. Just as you don’t exert yourself much if you stand straight with good posture, a good efficient handstand is the same way… it will soon start to feel effortless.

Actually, the biggest hurdle to overcome – especially at the beginning – is the mental fear. The voice/feeling in the back of your head that says “you could get hurt doing this!” SCARY!

And I won’t sugar-coat things, you can hurt yourself working these skills… but it’s no different than if you walked into the gym first day, slapped 315 lbs on the bench press and gave it a go. Or went out and tried to run 13 miles without training. The exercise itself isn’t dangerous. Only if you approach it too fast.

If you wouldn’t load up a bar to 500 lbs your first day, why do so many people just kick and fling themselves up into a handstand, failing repeatedly, hoping one day they’ll “get” it? There’s a smarter way!

How do we overcome this fear and keep ourselves safe? Just like learning any other fitness skill: slow, easy, successful steps! These small victories accumulate overtime to bring us to our goals safely while having a lot of fun.

Are you ready to learn?

Don’t worry, we’ve got you covered. Read on for ways to safely progress to handstand mastery!

The Safe Way To Start: Wrist and Shoulder Handstand Warm-up

For any handstand exercise, there is going to be a significant amount of stress on the hands and wrists… you’re not Cap! So, it’s important you stretch and warm things up.

Here is a video going over some of our favorite wrist stretches to prepare to get upside-down. Go through each stretch about 10 times.


The shoulders are another stressed area in the handstand. There are several ways we can prepare them for work, but a few rounds of jumping jacks or even just arm circles will get the blood moving and the area ready.

Beginning Handstand Progression: Start Small and Level Up As You Get Stronger & More Confident

wall walk 2

For the first two weeks of your handstand journey, we’ll have you work with some balance drills and some positional drills. Nothing too crazy, and in fact some of these might seem TOO EASY. That’s fine! That’s what we want, remember?

We’re using small victories to motivate us. Dropping you on your head in the quest for a handstand is not a way to motivate anyone. Well, maybe this guy.

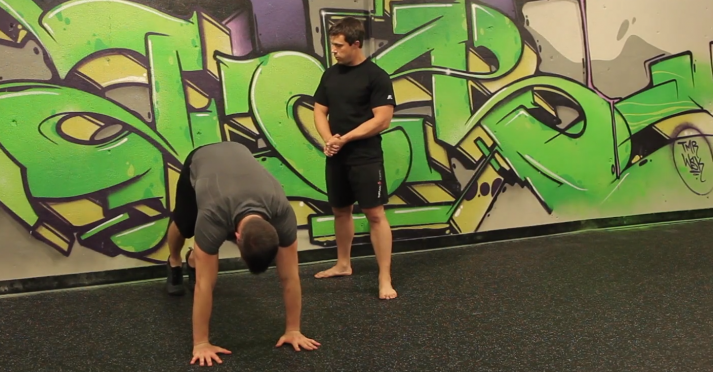
We recommend you focus on four exercises: the wall walk,hollow body, quadruped rock, and crow pose:

Wall walks

wall walk

In this drill, we’ll get started right away working toward something that actually looks like a handstand! If you’re like me, you’ll probably get excited and start to overreach a bit at this point. But I believe in you: don’t let the enthusiasm and suspense get the best of you!

All we’re trying to do with this exercise is support our bodyweight on our straightened arms (just like the front plank or pushup).

So, the first level of this exercise is to simply get yourself up into the top of a pushup and holding.If that’s too hard,put your hands up on an elevated surface and/or rest on your knees and hands instead.

Once this is mastered, level up by simply lifting your hips in the air into a down dog position!

From here, it’ll be a matter of getting your feet onto a higher and higher surface. Note: putting your feet up something (I like bumper plates) even a few inches off the floor counts – small steps! As you progress, add more bumper plates (or whatever you’re using) so your feet are higher and higher.

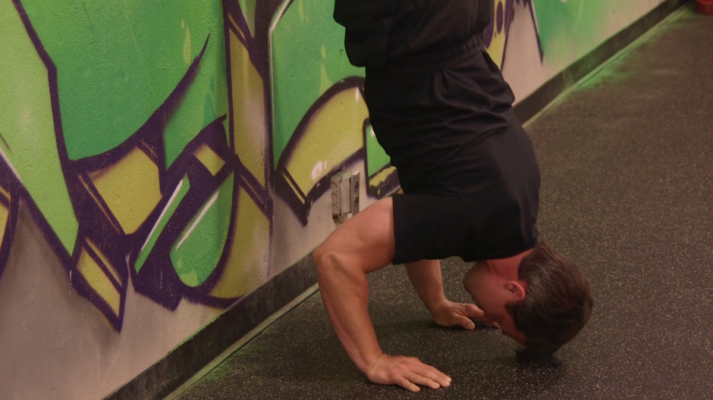
Once you are supporting yourself with your feet on a high box, try walking your feet up the wall. (Think of it like a really tall box!)

Be careful at this step: Be sure you have enough energy to walk back down safely and second, and that you don’t walk too close to the wall and risk flipping onto your back!

With each of these variations, we’re looking to build up to a solid 15 seconds under control before moving forward.

Hollow body

hollow body

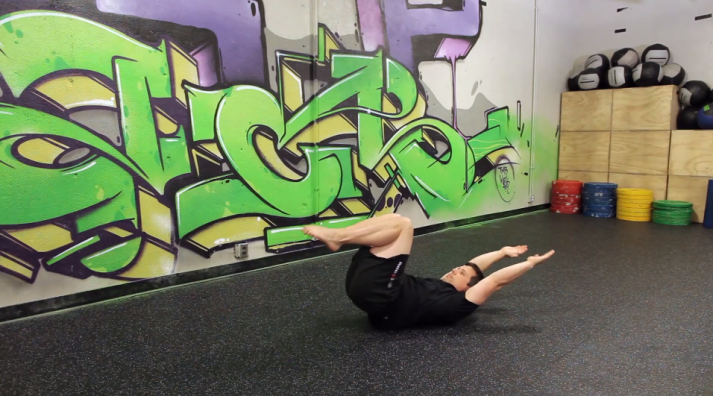
The hollow body is one of the best ways to to engage the midsection and stabilize the body. It will help to give your handstand a good shape. Do you need to master the hollow body to master the handstand? Not necessarily, as there are plenty of handstands out there that are a bit banana-shaped. But the hollow body will help you create a more efficient position.

Start by laying down a yoga or exercise mat on the ground and laying on the ground face up. Think about pressing your lower back down into the ground and engaging your midsection like you’re coughing. You should still be able to breath!

Once the midsection is set, tuck your knees to your chest and hold your shins like you’re getting ready for a wicked cannonball. Holding the shins will help you maintain that lower back and midsection position.

Still feeling good? Then try rocking! Rock your body forward and back slightly from the upper back to the lower back, like a rocking chair. Head and feet stay off the ground. If you are stable then you should move as one unit.

If you need more of a challenge, reach your arms by your ears, keep the knees tucked, and rock some more. Without the hands holding the shins, the midsection really has to keep engaged in order to give you a smooth rock.

Again, with any of these positions, build up to be able to rock for a full 15 seconds under control.

Quadruped Rock

quad rock

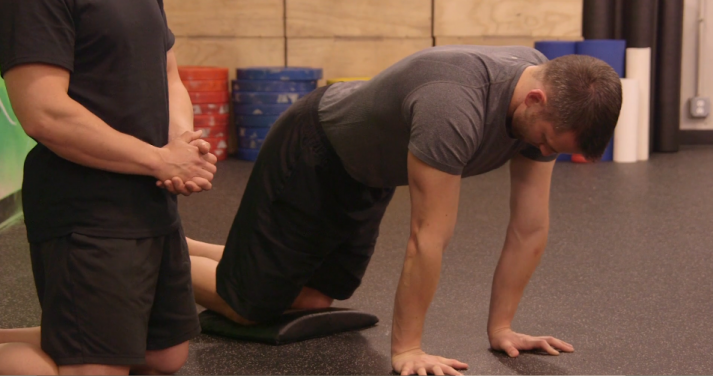
You may be thinking that feeling the balance of a handstand is going to be brutally difficult. Not so! We can start quite easily on our hands and knees in the quadruped position.

From here, we will simply rock forwards and backwards on our hands. Seem familiar? If you did the wrist mobility we described above, it’s the same motion! Isn’t that handy?

As you are rocking back and forth, feel where the weight rests in your hands. When you rock back, it sits more in the heel of your hands. When you rock forward, you’ll feel it in your knuckles and fingertips.

Where do we want it in the handstand? Right around the knuckles. This is a balanced spot – similar to the balance you find when standing. You don’t sit all your weight on your heels, and you don’t lean all your weight forward, gripping your toes hard into the ground, do you? Find and feel that balance when you rock.

Ready for the next step? Try Crow Pose.

Crow Pose

crow pose

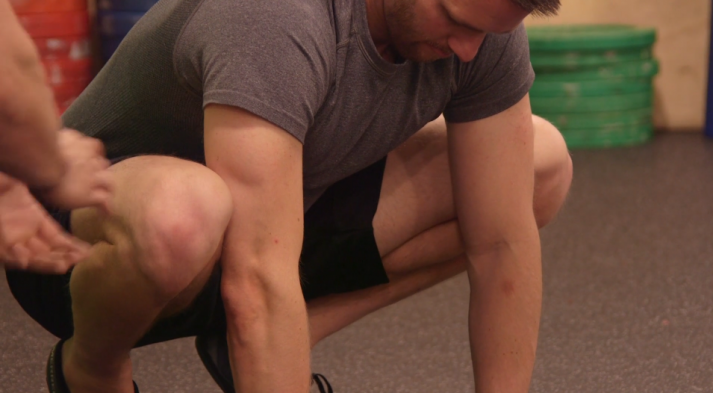
To enter Crow Pose, move forward from the Quadruped Rock position so that your knees are on the outside of your arms. You can even bend the elbows a little and rest your legs on them.

Rock forward in the same manner as before, putting a little more weight on the hands and a little less weight on the feet.

Important: this isn’t Assassin’s Creed… We are not making a leap of faith here! Don’t jump!! We are simply looking for less and less weight on the feet. Take things slow and easy – rising up on the toes when you can. When you are ready to pick the feet up and hold yourself off the ground on just your hands, it should come naturally.

Be sure to grab into the ground hard to hold and control yourself, and feel free to put down a pile of pillows or mats in front of you if you should fall!

All these rocking and balance drills can be done for several sets of 5-10 reps. Listen to your wrists and give things a rest as needed.

Tips and Tricks

handstand tips

Nothing beats patience and hard work, but there are a few tips and tricks we can provide that will allow you the best chance for success.

Make sure you go through a proper warm-up: We’ve given you several options for the wrists and shoulders. Not only will a warm-up help prevent injury, but it will get the muscles and joints properly prepared to get the most out of your training.

Prioritize Your Handstand: You can work the skill on its own time, and it won’t interfere or be interfered by anything else, but what if you’re doing other exercises during your workout? When do you handstand?

The best time to work the balancing drills is at the beginning of your workout, after you’ve warmed up. These skills require concentration and a fresh focus to really benefit and progress with them. Trying to balance after you’ve exhausted yourself with a tough cardio session is an exercise in futility (pun intended).

The best time to work the positional drills would be sometime during your strength session, and before your cardio. These drills are not as dependent on completely fresh muscles, but we still don’t want to try and hold ourselves upside-down after a grueling workout.

Too much, too soon.

We’ve mentioned this a million times because it’s so important. Taking on too much too soon is a way to develop bad habits and possibly injure yourself. Take your time! Enjoy and really master each step!

Take it Easy: In the same vein, we want to look for success. What do I usually see when people practice handstands? Someone kicking up 100 times and kinda getting a handstand once or twice. How much sense does that make? While we might not be batting 1,000 with all our attempts, but we should be looking to successfully complete around 8 out of 10 attempts. If we’re not? Then we might have taken on too much, too soon!

The 5-Minute Rule: Practice Handstands Every Day and Be Amazed at What Happens

Commit to 5 minutes a day. That’s it. But do it every day.

I’ll see a lot of people go all in for a single handstand session, and then not touch the skill for a week or more. Dan Gable once said, “If it’s important, do it every day.” Now this is a simplification, but with handstands, this is ESPECIALLY important.

When you first start out, your arms and shoulder may only be able to do 5 minutes before they are DONE. Doing them for a short time each day is the best strategy to improve strength, endurance, and balance.

And if you’re interested in diving deep into handstands, we have something awesome for you next week. Stay tuned!

Have you ever tried to kick up into a handstand?

What’s the one thing holding you back?

What questions can I answer?

-Steve

###


source http://www.nerdfitness.com/blog/2016/10/17/a-beginners-guide-to-handstands/

Friday 14 October 2016

5 Common Mistakes When Doing A Proper Squat

Can you do a bodyweight squat? Great!

Now, can you do a PROPER bodyweight squat?

Right now you’re asking, “What’s the difference, Steve you weirdo?!”

Today I’m gonna drop some bodyweight squat knowledge bombs on you. Don’t worry, they don’t hurt! Instead, they’ll make your body feel good, and you’ll say: “OOHHHHHHHH, that’s what a squat is!”

Like other basic movements like the pull-up and push-up, most people think they know what a bodyweight squat is, and they think they’re doing them right… but are they?

Judging by the people in my gym, 80%+ of people are actually making some major mistakes in their squat, making the movement inefficient at best and dangerous at worst!

If you have any interest in ever being able to do a barbell squat, you need to first nail the mechanics for a proper bodyweight squat.

We got you covered: the end of this article you’re going to know exactly what to do and how to remind yourself to keep good form.

We were recently at Camp Nerd Fitness, and NF Team members Staci and Jim along with myself put together a quick 5 minute video for you explaining the ins and outs and the problems people have with bodyweight squats.

Watch the video and check out the mistakes most people are making with bodyweight squats below.

5 Common BodyWeight Squat Mistakes

Click squat video above, or view here.

Mistake #1: You stance is too wide or too narrow! Everybody is genetically different, with different sizes, leg and torso lengths, etc – but even still – there are a few key points for any squat that we want to achieve.

We see people often stand too wide or too narrow with their feet, and thus their squat suffers by failing to get low enough or being off balance. A big part of this comes down to hip mobility – sometimes our bodies can’t yet get as low as we should be able to.

Solution: Set your feet about at shoulder width apart, with feet turned slightly out (15-30 degrees). Not parallel with each other like railroad tracks – this can prevent proper depth, twist knees, or mess with your balance.

Mistake #2: Your knees don’t track over your feet! Imagine you drew a line from your heel to your toe, and extended that line in both directions for infinity. Your knees should bend and flex over that line.

If the knees collapse inwards (the most common issue) then you may very well be able to squat low, but you are going to be putting a lot of undue stress on the knees. Your knee is supposed to be a hinge. Putting sideways stress on your knee is a bit like hanging off of a swinging door. Sure, you could do it, but it just isn’t built to take that kind of beating!

Solution: Start in a good position! Before you even start to descend into the squat, think “knees out!” Turn your kneecaps out so they track right over your feet. Your feet and body aren’t moving – just the legs and knees! Try it right now wherever you are sitting or standing: keep your foot stationary, but aim your knee like a flashlight to face different directions.

Mistake #3: You don’t squat deep enough (a power curtsy!). Some people think squatting below parallel is dangerous for your knees. If that’s true then your knees would explode every time you went for a run, climbed a step, or sat in a chair. Your knees actually get STRONGER and healthier when you squat deeper. Deep squatting makes for a complete movement that recruits all muscles in your legs. When you only squat a bit, you’re not recruiting all leg muscles, and that leads to imbalance and injury.

We are not advocating that you squat into a range of motion that causes pain. The first rule of exercise is “do no harm!” But we often see a host of people not squat low enough either out of fear, misinformation, ego (too much weight on the bar!), or just because they’ve made another mistake on this list.

Solution: Squat like a toddler. Ever see a toddler squat down? How low do they go? Until the backs of their legs touch their calves, right? If you can do this, congratulations! Many have lost the necessary mobility or strength to be able to do this.

If you lack the strength, try grabbing onto a door, squat rack, or workout box to assist you into a deeper range of motion. If even this doesn’t help you, then mobility is your weak point. Practice the assisted squat as seen in the video and spend time pausing in the bottom and you’ll be on your way to improved mobility in no time (note: this will be difficult at first).

Mistake #4: You don’t keep your back straight and core tight. “Straight” doesn’t mean that your torso should remain straight up, perpendicular to the ground like a telephone pole. That’s not how the body moves naturally. We naturally lean a bit forward as we drop down into the squat.

By “straight” we mean that the natural curvature of the spine should be maintained for the entire squat movement. If you drop to the bottom of the squat and look like Gollum hunched over the One Ring, then we have a problem if you ever want to squat with extra weight.

Solution: Think: “chest up”. This doesn’t mean “head up” – chest means your chest. Don’t let your head fool you. Puff it up a bit in your squat, like Superman. Did you know that the S actually stands for squats? Yeah, true story.

Be sure to keep your midsection tight and engaged. It should feel like all the muscles around your middle are tensing a bit – like when you cough, or if you were Neo bracing from a punch from Mr. Smith.

Mistake #5: You get up on your toes. Keeping your feet on the ground is essential for a strong and balanced squat. It is your foundation! If you are just squatting down to grab something or look under something, then popping up on the toes a bit is of little concern, but if you are training your body to eventually move weights around (whether in the gym or everyday life), it will benefit you to keep the feet on the ground during your workouts.

Solution: Keep your heels down.

Bonus Mistake #6: You’re overly concerned with your knees going past your toes on your squat. This is an old wives tail bro myth that makes a lot of people freak out over nothing! Depending on your genetic makeup and physiological makeup, your knees may very well go past your toes on a deep squat. This is not the end of the world!

Solution: Let the knees and ankles flex how they were designed! It is a combined effort the hip, knee, and ankle closing that will get you in a deep, strong squat!

Any preexisting conditions or knee pain notwithstanding, there is no risk to the knees by allowing them to go forward of the toes. There is not a magical field that lives in front of your feet that destroys knees that drift too far. If this were the case, we’d see legions of crippled olympic weightlifters – where the knees go WAY past the toes– heck, they even wear shoes with elevated heels so that they can get their knees forward more!

Start doing better squats today!

squat child

There you go, my dear rebel friend, you now have everything you need to get started down a healthier path to crushing pull-ups.

To recap:

  1. Your stance is too wide/narrow
  2. Your knees cave in/don’t track over feet.
  3. You squat too high.
  4. Your backs rounds
  5. You lean forward on your toes
  6. Bonus: You worry about your knees going past your toes

Check back later this week for more articles and videos on how to improve your favorite bodyweight movements. And if you’re not already signed up for our email list, make sure you are so you don’t miss email-only bodyweight information this month!

-Steve

###


source http://www.nerdfitness.com/blog/2016/10/14/5-common-mistakes-when-doing-a-proper-squat/

Wednesday 12 October 2016

5 Common Mistakes When Doing a Pull-Up

Can you do a pull-up? How about a chin-up?

Whether you can or you’re working towards your first, are you suuuuuuure you’re learning how to do them the right way?

As someone who has been training in a commercial gym for the past 15 years, I see people every day doing “pull-ups” and “chin-ups” … but probably 90% are doing them wrong.

It’s like watching Joffrey sword fight. Yeah, he’s putting a lot of energy into it and moving around, but anyone watching can tell that it’s not terribly effective.

Whether you can string together 10 pull-ups already or are still working towards your first one, today we’re going to cover all of the big mistakes people make when doing a pull-up or chin-up, and how to make sure you’re doing them right.

Your shoulders, back, and arms are complex pieces of machinery – do proper pull-ups and you’ll be building uber strength and mobility in all the right places. Do them improperly and you might be setting yourself up for an injury.

Zoiks!

I can tell you’re awesome, so I went ahead and made a video for you too to walk you through all of this stuff. Watch the video below and read about the mistakes underneath it to make sure you’re training your pull-ups correctly!

5 Mistakes People Make with Pull-ups and Chin-Ups

Mistake #1: You don’t extend low enough or pull high enough. Full extensippppppon and full range of motion are major problems for many people training pull-ups and chin-ups. Most people I see in a gym are doing half pull-ups. Either not pulling high enough, not dropping low enough, or both! It’s not a full rep, and it’s robbing your body of effective work.

Solution: Leave your ego at the door! Yes, pull-ups are tough, but half effort gives you half results. With each repetition, you want your body to be in a straight line at the bottom – keep your elbows extended and your shoulder relaxed slightly up to your ears. Full range of motion for the win! Better to do a few proper pull-ups than more half-rep ones.

Mistake #2: You don’t engage your shoulders at the start. Another problem I see with people is not setting one’s shoulders properly when they start their pull-ups, which can put unnecessary strain on your joints/tendons/muscles. It can also be the difference between being able to get your first pull-up or chin-up and flailing around on the bar!

Solution: Imagine pinching a pen in between your shoulder blades, then do the pull-up. In other words, pull your shoulders down and back before you bend your elbows to pull-up. This puts us in a far more efficient position. By not using our back and shoulder muscles fully, and over the long run we’ll be weaker and at a higher risk for injury.

Mistake #3: You’re doing too hard of a variation. Whether it’s lack of strength or too much body mass, you should choose a variation that allows you to have great form while getting stronger. Use a box, an assisted band, or an assisted pull-up machine to start at a low weight and build up your strength.

Solution: Always do proper pull-ups and chin-ups. Get your chin over the bar from a hang with every rep, and maintain good form. If you find yourself committing the mistakes on this list, make your variation easier.

Mistake #4: Not engaging your shoulders at the top. Many people will get a good extension at the bottom of their chin-up and start off with great form. But then as they perform the movement, will find their shoulders in a poor position at the top.

A classic sign this is happening is if the chest/neck doesn’t touch the bar, or the body curls inward significantly at the top. Is your shoulder elevated to the ears or rolled forward? Are you shrugging your shoulders as you’re struggling to get above the bar?

Solution: Make your variation easier by working on an assisted chin-up and maintaining a strong shoulder position at the top. Keep your shoulders down and back and engaged through the movement.

A chin over the bar is a chin-up – we aren’t trying to take away your chin-up if you aren’t getting your chest to the bar. But consider this a progression to even better form so you can eventually work on harder skills like pull-up variations or the legendary muscle-up.

Mistake #5: You use violent kipping motions to do your pull-ups or chin-ups. We know CrossFitters use the kip to get more pull-ups in a short amount of time. NOW, it is the humble opinion of our team that you should only be kipping AFTER you are capable of doing perfectly functional and safe pull-ups and chin-ups first (in fact, many CrossFit gyms require qualifying strict pull-ups before you can kip).

Solution: Build strength and good position (the foundation!) before you worry about speed. You want to know how to drive a car before you learn how to race it!

Start doing better pull-ups today!

There you go, my dear rebel friend, you now have everything you need to get started down a healthier path to crushing pull-ups.

To recap:

  • Not full range of motion
  • Shoulder not engaged at the beginning.
  • Shoulders not engaged at the top
  • Too hard a variation.
  • Kipping before strict.

Check back later this week for more articles and videos on how to improve your favorite bodyweight movements. And if you’re not already signed up for our email list, make sure you are so you don’t miss email-only bodyweight information this month!

Can you do a pull-up? What was or is currently your biggest challenge?

Any pull-up or chin-up related questions for us?

-Steve

###


source http://www.nerdfitness.com/blog/2016/10/12/5-common-mistakes-when-doing-a-pull-up/

Friday 7 October 2016

PILATES-THE BASICS

The Pilates basics include breathing, core activation, control, concentration, precision and flow. All things we need in or every lives.

Breathing- correctly can help relieve stress and intra-abdominal pressure. Just the act of breathing alone can release tension, reduce anxiety and strengthen your core.

Knowing how to use your core will make everyday movements safer and protect your lower back. For example lifting a heavy load. If you have a solid understanding of Pilates you will naturally exhale on the lifting phase, engage your core and lift with good posture. Thus protecting your back, keeping tension out of your neck and shoulders and using the power in your legs and bum.

Rotating with good technique using your oblique’s can prevent twinges in your back and tension in the shoulders. Squatting or lunging rather than bending will ensure you use the global leg and bum muscles and not puts strain on the lower back. All techniques you can learn in your Pilates class and with the aid of our Pulseroll this also can help improve your flexibility.

The concentration use in Pilates can be transferred into your work and home life. Being able to clear your mind and bring your focus to your body, is a useful relaxation technique and can bring mental clarity. People often leave the studio feeling calmer, refreshed, and less anxious and more in control of life.

I personally love the control and flow in Pilates being able to go from one movement to the next using a natural rhythm and flow has a certain beauty to it. If you can apply that to the tasks you have to do in day-to-day life, life becomes more beautiful! It is something to aspire to. Flowing from one task to another, multi-tasking in a calm, concentrated manner and being precise in all you do.

The post PILATES-THE BASICS appeared first on Pulseroll.


source http://www.pulseroll.com/pilates-the-basics/

source http://pulseroll.blogspot.com/2016/10/pilates-basics.html

Thursday 6 October 2016

Work Out At Home, At the Office, Or Anywhere You Want: How to Get Started With Bodyweight Training Today!

Today you take your first steps towards becoming a ninja/jedi/assassin/superhero, without needing to foot in a gym.

Interested? Of course you are!

That’s 4 amazing things all combined into a nerd mecha-robot.

Here’s the deal: It doesn’t matter if you’re a 300-pound guy who wants to lose weight and get back in the dating scene; it doesn’t matter if you’re a mom of three who wants to drop a little fat and gain a little muscle; it doesn’t matter if you’re an in-shape twenty-something who’s just looking for a new workout challenge.

Right now — right in front of you— are all the tools you need to get into amazing shape and live a healthier, happier life.

So…just where the heck are these tools? Check the mirror! Seriously go look in the mirror.

Did you go look? That’s okay if you didn’t. But keep reading.

Bodyweight Training Can Change Your Body — And Your Life.

camp rings

“Use your body to improve your body.” – Something some zen master said at some point probably

Bodyweight training means doing any exercise that leverages your own bodyweight to build strength and muscle, burn fat, and become more resilient. Now, you might think that’s just basic stuff like push-ups and squats. And those things ARE bodyweight movements, and absolutely crucial to building a healthy foundation.

Hidden in plain sight, your own bodyweight is actually a complete training system waiting to be used. +5 points to Gryffindor for you being a complete training system. Go you!

Whether you want to use your bodyweight as a centerpiece in your training routine for decades to come (like me or Team Nerd Fitness Member Jim Bathurst), just build a foundational strength before you move to barbell workouts, or mix in some bodyweight training to compliment your yoga/swimming/running/dancing/international jewel thievery, today we’ll take you through exactly how to get started.

The best part: since bodyweight training scales in difficulty and has plenty of variety, it truly can be used from Level 1 to Level 50.

How Bodyweight Training Can Help You Build The Body You Really Want

pushups kid

Your body is a complex piece of machinery that has been fine-tuned over thousands of
generations. Think of yourself as Human Ver. 100000000.0.0.1. We’ve been doing “bodyweight training” as a species since our days as cavemen and cavewomen – except back then it wasn’t called training, it was called “life” and there were no spandex in sight:

Things like:

  • Sitting in a deep squat around a campfire with our tribe.
  • Crawling under and over things as we encountered obstacles in nature.
  • Pulling ourselves up into a tree or over a cliff to escape danger.
  • Pushing ourselves up onto a ledge or platform to get a better view.
  • Swinging from vine to vine as King of the Jungle. (Okay maybe not this one).

Because we’ve had to adapt to do all of those things to survive, our bodies LOVE the idea of working with all of our muscles and bones and joints in unison to accomplish movements or overcome obstacles.

It’s the reason we rage against the machines in the gym – cue “bulls on parade” – they often create imbalances and other weird problems through isolation and non-functional movement. Think of it this way: Cavemen didn’t pick up various rocks to isolate their triceps muscles or do “curlz for the cavegurlz.” And they certainly didn’t lie on a bench at a 30-degree angle while doing log presses to emphasize their upper pectoral muscles before going to kill a gazelle.

Instead, men and women did whatever they needed to do in order to survive — and their bodies adapted as a result.

If you’ve been reading Nerd Fitness for a while, you know I’m a fan of this quote from the trainer of the actors in the movie 300: “Appearance is a consequence of fitness.”

Bodyweight exercises tap into our full, natural anatomy. Movements like squats, push-ups, pull-ups, dips, and rows recruit all the muscles in our body and teach our body to work in unison. When you do bodyweight training, your body becomes more efficient working as a unified organism: all of your muscles, tendons, joints, and bones get strong as hell together — and safely.

Plus, you get to master your body like a freaking Jedi.

We know that strength training — with your bodyweight or with free weights — also happens to burn plenty of calories and builds muscle and strength. So it doesn’t matter if you’re male or female, young or old — bodyweight strength training can help you build a body that looks good and feels good. In fact, as you get older one of the best ways to feel young is to stay strong! Just ask our older rebels.

Period. Exclamation point! Loud noises!

Bodyweight Exercises Can Be Done Anywhere

pullup bar forest

Read that headline one more time. Crap, there goes that excuse for not exercising! You always have your body with you, which means you always have the ability to exercise, even if it’s just for a few reps here and there.

You can always improve yourself physically. Anytime. Anywhere. Whether you’re:

Seriously, right now you can just drop down and do some (knee/wall) push-ups.

I’ll wait.

You didn’t do them, did you?! You sandbaggin’ son of a biscuit… you SAILOR you.

Even if you DIDN’T do them, you weren’t completely overwhelmed at the idea of doing a few reps!

My point is this: You don’t need access to a gym to get in great shape. You simply need to know a few moves — which we’ll teach you below — and you can train anywhere.

You Can Make Bodyweight Exercises As Easy — Or as Challenging — As You Need

camp handstand

Although bodyweight exercises are a bit more tough to visualize as a scalable activity compared to weight lifting (where you just put more weight on the bar), with just a little bit knowledge bodyweight training is like improving a particular skill tree in video games.

For example, in the pushup you might start on your knees or with your hands on an elevated surface. Over time, by slowly adjusting the angle you are manipulating your bodyweight, you can effectively change the difficulty of an exercise to make it more challenging. With a tougher angle, you have to move a higher percentage of your bodyweight, and thus more strength is needed!

I guarantee you can train with just your bodyweight for the next 20 years and you will not reach a “MAX LEVEL” screen.

Here’s what an oversimplified progression tree for the pushup might look like:

Wall push-ups -> Knee push-ups -> push ups -> feet elevated push ups -> pike push ups-> handstand push ups.

Show me somebody that has advanced to the end of one or more bodyweight skill trees, and I’ll show you somebody that is in peak physical condition (and looks damn good too!).

Once you learn the progressions, it’s just like adding points to a skill tree or leveling up a skill to unlock the next one in a video game. You start at the base exercise, get stronger and better, and then rank up when that movement becomes too easy. Gamification ftw.

There’s always a new skill to work on, a new challenging variation, the next level in the skill you’re working on.

Bodyweight Exercises Build Great Physiques (Plus, They’re Great Party Tricks)

jim_handstand

If you’re like me (and the other 7.2 billion people on the planet), you might look at gymnasts or see what Jim Bathurst is doing in that photo above and say “holy crap I wish I had a body like that” or “dang, would be cool to do that, but not me.”

If you happen to be somebody who is stockier or heavier, you might look at bodyweight-training-jedi and say “I can’t train like them, because i’m not built like them. I need to lose weight first before trying to those things” You’ve got it backwards.

They look like they do precisely because they train like that!

In fact, we have TONS of success stories from people in our community, male and female who have transformed thanks to bodyweight training. Yours truly included!

Some people use the training to slim WAY down, others like me, use it to pack some muscle on (click on each photo for the story!):

Steve Before During
joe

Veronica-Before-After

Now, not only do ninja/assassin/gymnasts look good, they can also do some pretty cool party tricks – like Jim doing handstands on chairs above.

I don’t think I’ll be doing handstands on stacked chairs anytime soon, or busting out one-handed handstands, but it’s amazing to know what our bodies are capable of when we train them with conviction and follow the right progressions!

If you’re somebody who scrolls through Instagram far too often (like me!), use motivation properly and follow people that inspire you to be stronger, fitter, and better.

May I suggest:

How to Get Started With Bodyweight Training

Steve Squat

At this point, you’re most likely nodding your head at your computer and saying “okay fine Steve I get it, I’m going to make bodyweight training a focal point of my training!”

Seriously, I can see you. You look nice today, and those shoes go great with that shirt.

But you might think you’re too overweight or too old or too [something] and that’s all nonsense. Hogwash. Poppycock. Balderdash. (Here’s that 53 year old Gymnast again who is in better shape than 99% of people 20 years younger.)

If you’re brand new to Nerd Fitness, we recommend you get started with the Nerd Fitness Beginner Bodyweight Workout. Read the article, and watch the video below, featuring me about 30 pounds lighter and with helmet hair:

(Fun fact, this is our most viewed video on Youtube at 700,000 views, and my shorts are on backwards. Professionalism at its finest!)

If you’re feeling particularly feisty, check out our Advanced Bodyweight Workout too.

Quick note: If you’re looking for more structure and variety and a boss battle system, you can check out the Nerd Fitness Academy, our flagship program with boss battles and a leveling system with 7 levels of Bodyweight Exercise Routines (and video demonstrations!) to follow along with as you level up.

But you can get started with the basic stuff right, now, equipment and cost free! Start today by creating a free character and start working your way through the Assassin Quests which are primarily bodyweight focused!

Here are the three moves I want you to master:

If you can do a workout with 3 sets of 10 push-ups, 3 sets of 20 bodyweight squats, and 3 sets of 5 pull-ups, you will be in better shape than 95% of your peers.

Are those movements too easy for you? We have more advanced stuff soon…

Struggle with these movements? Don’t worry, more articles coming this month to help you perfect each of them!

Speaking of this month…

It’s Bodyweight Training Month at Nerd Fitness!

lego push-up

In case you missed it, this month we’re trying something different here at Nerd Fitness: We’re declaring October Bodyweight Training Month!

(Funny story: Our bodyweight guild at NF is the “Assassins’ Guild,” but for SOME REASON our lawyers didn’t think “Assassin Awareness Month” would go over well with the general public. But you and I will know the REAL name. Wink wink nudge nudge.)

It doesn’t matter if you’re a complete beginner or a super-fancy advanced person: We have lots more bodyweight training articles, tutorials, videos, and other surprises planned for you this month, so make sure to keep up!

And coming later this month… we’ll unveil our newest top-secret project: An easy-to-follow bodyweight training system for serious Rebels who want to look like a gymnast and perform like a Jedi (zing!) — without stepping foot inside a gym.

I mean, I’m pretty excited about it. Okay I can get excited about pretty much anything, but this especially.

But for now… answer me this:

What is the BIGGEST thing holding you back currently from getting started with bodyweight training?

What’s one reason you are going to add bodyweight training to your routines this month?

Leave your comments and questions below and we’ll do our best to answer them.

-Steve

###

Photo: Leg0Fenris:Lego Pushup, Exile: Pull-Up Bar


source http://www.nerdfitness.com/blog/2016/10/06/work-out-at-home-at-the-office-or-anywhere-you-want-how-to-get-started-with-bodyweight-training-today/